
Whew, that was a long chapter... but yes, indeed, Chapter 4 of Strawberry Syrup is finally complete! At... 54 pages... yeesh.
If I'm being completely honest here, the chapter should have ended about twenty pages back, when Hunter was first turned into a chipmunk. However, at the time, I hadn't thumbnailed ahead and thought there would only be a few more pages after that.
... I don't remember WHY, exactly, I thought that, but I do remember that I did.
All this boils down to, basically, is that thumbnailing chapters in their entirety before even starting the final pages is a good thing, while just winging it is not exactly ideal.
Now, normally I'd be taking a break after the chapter end, but due to the hiatus, there's no way I'm taking any time off now. And fortunately, I don't have to! I'll admit, I haven't planned out all of Chapter 5 yet, but I have got a good chunk of it down, and I'll be working on the thumbnails long before I finish what I've currently got done.
Way better than winging it. ^_^;;
(And for those of you wondering what the heck I'm talking about, a "thumbnail" is a small, usually quick sketch of the comic page. They're generally much smaller than the finished page, and may consist entirely of stick figures. They're just meant to give the artist a good idea of layout and story flow. Personally, I prefer slightly more detailed thumbnails so I can make sure everything works well before I'm left stumped by a sudden issue on Tuesday night.)
Showing posts with label process. Show all posts
Showing posts with label process. Show all posts
Wednesday, September 7, 2011

Friday, August 26, 2011
Dangers of an Impulse Buyer
I admit it: I can be a little impulsive when shopping. Book stores and craft stores are definite weaknesses. Today's venue of choice: Hancock Fabrics. They had a sale on a brand of patterns, so my SIL and I headed over there to check it out.
Now, I am a very novice seamstress, and I'm mostly interested in bag, pouches, and so on, so I stick mainly to fabric remnants and quarters. And then... there's the patterns. Soooo many patterns... which is where being an impulsive buyer can get me into trouble. I think, "Well, I might learn something from this one!" And, of course, since I'm a complete n00b in the realm of sewing, I can learn something from just about every pattern I come across. I justify it with, "Well, when I learn these techniques, eventually I can create my own patterns, and then I can actually sell something!"
Before I know it, I've got ten patterns piled up.
This happens in book stores and other craft stores, too, especially when things are on sale. If I'm not careful, I could end up spending a whole lot more than I intended.
Fortunately, there's a way to help prevent it - or at least minimize the damage: delay check-out. Rather than grabbing things and heading straight to the nearest register, I spend some time walking around with my stuff. Eventually, I'll start thinking, "Okay, do I REALLY think I'll use this? Will I actually READ this sometime soon?" If the answer's no, then I put it back.
So far, it's been working pretty well. Then I just have to be careful not to grab anything on the way to the register... or at it.
Now I just have to put some of my new goodies to use.
Now, I am a very novice seamstress, and I'm mostly interested in bag, pouches, and so on, so I stick mainly to fabric remnants and quarters. And then... there's the patterns. Soooo many patterns... which is where being an impulsive buyer can get me into trouble. I think, "Well, I might learn something from this one!" And, of course, since I'm a complete n00b in the realm of sewing, I can learn something from just about every pattern I come across. I justify it with, "Well, when I learn these techniques, eventually I can create my own patterns, and then I can actually sell something!"
Before I know it, I've got ten patterns piled up.
This happens in book stores and other craft stores, too, especially when things are on sale. If I'm not careful, I could end up spending a whole lot more than I intended.
Fortunately, there's a way to help prevent it - or at least minimize the damage: delay check-out. Rather than grabbing things and heading straight to the nearest register, I spend some time walking around with my stuff. Eventually, I'll start thinking, "Okay, do I REALLY think I'll use this? Will I actually READ this sometime soon?" If the answer's no, then I put it back.
So far, it's been working pretty well. Then I just have to be careful not to grab anything on the way to the register... or at it.
Now I just have to put some of my new goodies to use.
Thursday, September 16, 2010
Sometimes Research is Gyaaaaaah
I put off this week's page of Strawberry Syrup as long as possible. It's one I've been dreading ever since it was conceived. Why, you ask? What could be so bad about this particular page?
I'm arachnophobic, and this page has a close up of a spider.
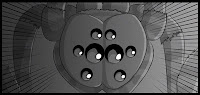 Just drawing a spider wouldn't be bad. I know from years of them dropping on me, crawling on me, and generally doing their best to freak me out what spiders look like from a distance. However, this was a close up, and like any responsible artist, rather than just wing it, I grit my teeth, braced myself, and headed over to deviantArt to check out spiders in the photography section.
Now, I'm not as bad as I used to be. A few years back, I went on an ill-thought-out canoe trip with two other people. I'd never been canoeing before... and it turned out that neither of the other people had any idea what they were doing. Fortunately, it was a calm river, but I had to learn fairly quick how to steer a canoe from the middle when the person in front kept strong-arming us into the shore with epically bad paddling skills.
During one of those collisions with driftwood and whatnot, a branch fell into the canoe. Turned out there must have been a spider convention on that branch, because five minutes later, once we're into the middle of the river and I've finally commandeered the other paddle from Captain Disaster and Person #3 has been worked up into a thorough panic, there were at least twenty small to medium size spiders crawling all over the boat.
 Running away screaming was not exactly an option, and we already had one person near-hysterical, so I managed to keep my cool, ditch the branch, ignore or slay most of the spiders, and calm #3 down enough to follow directions. Since that day, I haven't felt that utter terror that used to accompany the mere thought of spiders.
That doesn't mean I like them or love looking at them.
Gyah. GYAAAAAH. I am so gonna have nightmares tonight! ><;;
I'm arachnophobic, and this page has a close up of a spider.
 Just drawing a spider wouldn't be bad. I know from years of them dropping on me, crawling on me, and generally doing their best to freak me out what spiders look like from a distance. However, this was a close up, and like any responsible artist, rather than just wing it, I grit my teeth, braced myself, and headed over to deviantArt to check out spiders in the photography section.
Now, I'm not as bad as I used to be. A few years back, I went on an ill-thought-out canoe trip with two other people. I'd never been canoeing before... and it turned out that neither of the other people had any idea what they were doing. Fortunately, it was a calm river, but I had to learn fairly quick how to steer a canoe from the middle when the person in front kept strong-arming us into the shore with epically bad paddling skills.
During one of those collisions with driftwood and whatnot, a branch fell into the canoe. Turned out there must have been a spider convention on that branch, because five minutes later, once we're into the middle of the river and I've finally commandeered the other paddle from Captain Disaster and Person #3 has been worked up into a thorough panic, there were at least twenty small to medium size spiders crawling all over the boat.
 Running away screaming was not exactly an option, and we already had one person near-hysterical, so I managed to keep my cool, ditch the branch, ignore or slay most of the spiders, and calm #3 down enough to follow directions. Since that day, I haven't felt that utter terror that used to accompany the mere thought of spiders.
That doesn't mean I like them or love looking at them.
Gyah. GYAAAAAH. I am so gonna have nightmares tonight! ><;;
Tuesday, August 31, 2010
Popsicle: Complete!
Yep, I finally got around to finishing it! To be honest, going to Marietta actually helped. I had a vague idea of what I wanted in the background (as you might have been able to tell from the line art), but after going to a small river town, that really stuck with me. The result:
Popsicle by ~Kitsune64 on deviantART
I tried out a few different things with the background, among them custom brushes and textures. Some worked well, some... not so well. Still, I like the overall picture, even if I still haven't quite gotten the hang of rendering a "painterly" background.
Plus, I managed to get a pic up for August. How an entire month went by without me posting a single pic in my deviantArt gallery is beyond me. Oo;; I'm just glad I noticed before September 1st!
Popsicle by ~Kitsune64 on deviantART
I tried out a few different things with the background, among them custom brushes and textures. Some worked well, some... not so well. Still, I like the overall picture, even if I still haven't quite gotten the hang of rendering a "painterly" background.
Plus, I managed to get a pic up for August. How an entire month went by without me posting a single pic in my deviantArt gallery is beyond me. Oo;; I'm just glad I noticed before September 1st!
Saturday, August 21, 2010
Kit and Coptic Binding
New skill is go!
After a trial run with a card stock cover and ordinary type paper, I've created my first hard cover journal/sketchbook!

It measures in at approximately 4 1/2 x 6", with 120 pages. I used one of my favorite pics, Terry in Flight, for the main image on the cover. Yeah, it's a little old (it was done in '06), but it's still one of my favorites. Behind that, the top image is an old map found in the Wikimedia Commons. Seeing as it was an OLD map, it was in the public domain, and thus free to be used as a backdrop. Below that, I simply gathered together a bunch of quotes that relate to creativity, imagination, and whatnot. They create a sort of visual white noise, set the mood for the journal, and are ones the resonate personally with me. Rather than assemble it collage-style, I went ahead and put it together in Photoshop and printed out the final product.
 In almost all the Coptic-bound books I've seen, the spine is open. Either this is to show off the artistry of the stitch, or it's really difficult to do a cover over the spine. In my trial run, I used three rows of stitches, which worked fine, but I wanted something a little more... secure-feeling, so this one's got five. For the cover, I hunted down the backing from an old calendar - you know, the cardboard inserts the manufacturer sticks in to keep it from horribly deforming during the shrink wrap process? Well, not all of them are normal cardboard. Some of them are a really rather nice variety. I snagged some of that (See? Never know what you'll need later!), and with the reinforcement of the Mod Podge, it's turned into a really nice hard cover.
 For the paper, I pillaged an old, mostly unused sketchbook for some 50lb sketch paper. Now, the really nice thing about Coptic binding is that it has the ability to lay flat on just about any page without needing a wire spiraling through it. I wouldn't suggest pinching the covers together and waving it like a fan or anything, but the binding does seem to be pretty secure, even if there is a little more movement than I'm used to in a journal.
 For the thread, I used embroidery floss, whittled down to three strands and then braided. I haven't done any strength tests on embroidery floss lately, so braiding it together gives it a little more strength and security. Color-wise, the top contenders were blue and brown. Blue won out - it picks up the color in his hat and the text better.
 About the only problem I'm having so far is that the first and last rows - the rows where one signature of paper is attached to the next - don't quite look right. I'm using a "one needle" technique, so maybe that's it. That, or I'm not doing something right. If any of you have any idea what I'm doing wrong there, please do let me know!
Overall, I'm pretty happy with my little journal/sketchbook! I'll be keeping this one.
After a trial run with a card stock cover and ordinary type paper, I've created my first hard cover journal/sketchbook!

It measures in at approximately 4 1/2 x 6", with 120 pages. I used one of my favorite pics, Terry in Flight, for the main image on the cover. Yeah, it's a little old (it was done in '06), but it's still one of my favorites. Behind that, the top image is an old map found in the Wikimedia Commons. Seeing as it was an OLD map, it was in the public domain, and thus free to be used as a backdrop. Below that, I simply gathered together a bunch of quotes that relate to creativity, imagination, and whatnot. They create a sort of visual white noise, set the mood for the journal, and are ones the resonate personally with me. Rather than assemble it collage-style, I went ahead and put it together in Photoshop and printed out the final product.
 In almost all the Coptic-bound books I've seen, the spine is open. Either this is to show off the artistry of the stitch, or it's really difficult to do a cover over the spine. In my trial run, I used three rows of stitches, which worked fine, but I wanted something a little more... secure-feeling, so this one's got five. For the cover, I hunted down the backing from an old calendar - you know, the cardboard inserts the manufacturer sticks in to keep it from horribly deforming during the shrink wrap process? Well, not all of them are normal cardboard. Some of them are a really rather nice variety. I snagged some of that (See? Never know what you'll need later!), and with the reinforcement of the Mod Podge, it's turned into a really nice hard cover.
 For the paper, I pillaged an old, mostly unused sketchbook for some 50lb sketch paper. Now, the really nice thing about Coptic binding is that it has the ability to lay flat on just about any page without needing a wire spiraling through it. I wouldn't suggest pinching the covers together and waving it like a fan or anything, but the binding does seem to be pretty secure, even if there is a little more movement than I'm used to in a journal.
 For the thread, I used embroidery floss, whittled down to three strands and then braided. I haven't done any strength tests on embroidery floss lately, so braiding it together gives it a little more strength and security. Color-wise, the top contenders were blue and brown. Blue won out - it picks up the color in his hat and the text better.
  About the only problem I'm having so far is that the first and last rows - the rows where one signature of paper is attached to the next - don't quite look right. I'm using a "one needle" technique, so maybe that's it. That, or I'm not doing something right. If any of you have any idea what I'm doing wrong there, please do let me know!
Overall, I'm pretty happy with my little journal/sketchbook! I'll be keeping this one.
Monday, August 16, 2010
Kit Learns a New Skill
Every now and then, I like to go cruising through Etsy to check out what other people are doing, maybe get inspired to haul out the old arts and crafts materials and work on a new box. This time, I came across some of the handmade journals. Now, there are two things that consistently test my willpower whenever I go shopping: decorative boxes and blank books. I have an enormous collection of of sketchbooks and journals that have caught my eye over the years, but I'd never seriously considered making my own. After all, you need special glues and tools and things like that, right?
And then I saw these.
Pay special attention to the bindings. I've seen that kind of binding a few times in stores, but I'd never known what it was called. Say hello to the chain stitch, aka the Coptic Stitch in reference to the fact that this binding has been used at least since the days of the Dead Sea Scrolls (so sayeth Wiki).
A quick Google search led me to this tutorial. Turns out all you really need to bind your own journals is a needle, thread, and maybe something to punch holes with. It's kinda complicated to explain, but once you actually DO it, it's not all that difficult. It took me about an hour to bind a 60 page test book. I'm not saying I'm an expert or that I created the Bestest Little Journal out there on my first try, but the basics aren't too difficult.
I'll have to see if I can refine my technique and hunt down some better materials than what I used for my test book. If I can, I might be able to make some pretty cool stuff.
And then I saw these.
Pay special attention to the bindings. I've seen that kind of binding a few times in stores, but I'd never known what it was called. Say hello to the chain stitch, aka the Coptic Stitch in reference to the fact that this binding has been used at least since the days of the Dead Sea Scrolls (so sayeth Wiki).
A quick Google search led me to this tutorial. Turns out all you really need to bind your own journals is a needle, thread, and maybe something to punch holes with. It's kinda complicated to explain, but once you actually DO it, it's not all that difficult. It took me about an hour to bind a 60 page test book. I'm not saying I'm an expert or that I created the Bestest Little Journal out there on my first try, but the basics aren't too difficult.
I'll have to see if I can refine my technique and hunt down some better materials than what I used for my test book. If I can, I might be able to make some pretty cool stuff.
Wednesday, June 30, 2010
How to Develop a Twitch
Step 1: Run an older version of Photoshop on Windows 7.
Step 2: Compulsively save your work after every action for fear of the dreaded "Illegal action/Not enough RAM/You just lost half an hour's work!" pop-up.
*headdesk*
It's not a big enough problem that I'm going to shell out hundreds of dollars for a newer version of Photoshop. For one thing, I actually really like the version I have. But it's random spazzing at inopportune moments? Yeah, that I could do without, especially when I have to restart my computer every time it happens.
Needless to say, there's a reason this week's page is going slower than I'd hoped. However, it WILL get done! *strikes a pose of DETERMINATION!*
Now, back to your regularly scheduled programming.
Step 2: Compulsively save your work after every action for fear of the dreaded "Illegal action/Not enough RAM/You just lost half an hour's work!" pop-up.
*headdesk*
It's not a big enough problem that I'm going to shell out hundreds of dollars for a newer version of Photoshop. For one thing, I actually really like the version I have. But it's random spazzing at inopportune moments? Yeah, that I could do without, especially when I have to restart my computer every time it happens.
Needless to say, there's a reason this week's page is going slower than I'd hoped. However, it WILL get done! *strikes a pose of DETERMINATION!*
Now, back to your regularly scheduled programming.
Wednesday, April 7, 2010
The Comic Process, Part II: The Lines
After the Thumbnail, it's time to put the actual page together. For you familiar with the Western comics way, it's the pencils and inks. Because there really isn't much of a difference in appearance between the two, I'm just going to show you the inked version:
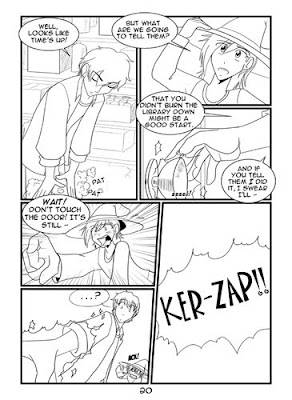
As you can see, nice clean lines, dialogue bubbles in place, black shadows added... Basically, this is how the page looks before I export it into Photoshop for the shading. If this were a print comic, I'd do screen tones in Manga Studio, but since Strawberry Syrup is a webcomic, I prefer to work in solid grays, and I tend to find it easier to do in Photoshop.
That, and I resize and crop the pages a bit - much easier in Photoshop.
Anyways, pay special attention to the panel where Hunter's about to grab the shiny glowing doorknob. In the thumbnail, you'll notice that there were originally two panels there. I decided that I really only needed one. The emphasis is now on his hand, rather than the hand shot just being glossed over by the eye.
Next time: the finishing touches!

As you can see, nice clean lines, dialogue bubbles in place, black shadows added... Basically, this is how the page looks before I export it into Photoshop for the shading. If this were a print comic, I'd do screen tones in Manga Studio, but since Strawberry Syrup is a webcomic, I prefer to work in solid grays, and I tend to find it easier to do in Photoshop.
That, and I resize and crop the pages a bit - much easier in Photoshop.
Anyways, pay special attention to the panel where Hunter's about to grab the shiny glowing doorknob. In the thumbnail, you'll notice that there were originally two panels there. I decided that I really only needed one. The emphasis is now on his hand, rather than the hand shot just being glossed over by the eye.
Next time: the finishing touches!
Tuesday, March 9, 2010
The Comic Process, Part I: The Thumbnail
Alright, so by now you're well aware that I have a weekly (heh, supposedly) webcomic, Strawberry Syrup. Here's how I come up with each page.
First up: the Thumbnail.
A thumbnail is basically a very quick sketch meant to help me figure out what elements I want on the page and where to put them. By 'very quick,' I mean no time spent on detail. Here's the thumbnail for Page 20 of Chapter 4:

As you can see, very quick, very sketchy, and not exactly an architectural blueprint here. There are three key things I need out of my thumbnails. 1) Where are the panels going? 2) Who's in each panel and what position are they in? 3) Where are the speech bubbles going? It doesn't take a whole lot of detail for me to tell any of those things, especially when most characters have some identifying characteristic. Dwayne's got his big ol' wizard's hat, Sammy's got glasses, Ferdy's got his cape... Not real hard to tell them apart.
Now, here's the important part: the thumbnail can change. They're not set in stone, and I'm allowed to change them, as you will see in Part II. By sketching it out nice and fast, I can see how it does or doesn't work, how another panel arrangement might work better, and what content might work better in each panel. If I weren't lazy or on a weekly schedule, I'd probably sketch out those variations, too, and pick which one looks best.
As it is, I thumbnail once, then wing it. Do not follow Kit's example there, kids. Ideally, you'll have each chapter thumbnailed well in advance. Trust me, it's easier that way.
First up: the Thumbnail.
A thumbnail is basically a very quick sketch meant to help me figure out what elements I want on the page and where to put them. By 'very quick,' I mean no time spent on detail. Here's the thumbnail for Page 20 of Chapter 4:

As you can see, very quick, very sketchy, and not exactly an architectural blueprint here. There are three key things I need out of my thumbnails. 1) Where are the panels going? 2) Who's in each panel and what position are they in? 3) Where are the speech bubbles going? It doesn't take a whole lot of detail for me to tell any of those things, especially when most characters have some identifying characteristic. Dwayne's got his big ol' wizard's hat, Sammy's got glasses, Ferdy's got his cape... Not real hard to tell them apart.
Now, here's the important part: the thumbnail can change. They're not set in stone, and I'm allowed to change them, as you will see in Part II. By sketching it out nice and fast, I can see how it does or doesn't work, how another panel arrangement might work better, and what content might work better in each panel. If I weren't lazy or on a weekly schedule, I'd probably sketch out those variations, too, and pick which one looks best.
As it is, I thumbnail once, then wing it. Do not follow Kit's example there, kids. Ideally, you'll have each chapter thumbnailed well in advance. Trust me, it's easier that way.
Subscribe to:
Posts (Atom)


